Technical explanations and concepts of RopView, a plugin made for BinaryNinja that does gadget analysis. This blog post describes the technical components of this tool.
Table of content
- Foreword
- Design and Components
- Compatibility
- Gadget Discovery
- Gadget Analyzer
- Semantic Search Filter
- Closing
![]()
Foreward
I recently published a plugin for BinaryNinja called RopView, a gadget analysis framework that integrates emulation into ROP searching, visualizing memory side effects. For some time now, I’ve been meaning to both develop a tool capable of this, but also contribute another plugin for the BinaryNinja community and found this project to be an excellent way to do both. During the entire development process, considering what would make the exploit developer’s life easier was at the forefront, because I myself wanted to make this something I would use over similar tools when building ROP chains and could easily incorporate into my workflow. What makes RopView different from other return-oriented-programming tools however, is not its interfacing with BinaryNinja’s BinaryView. That honor goes to its powerful gadget analysis and search engine framework, which operate in consort.
Design and Components
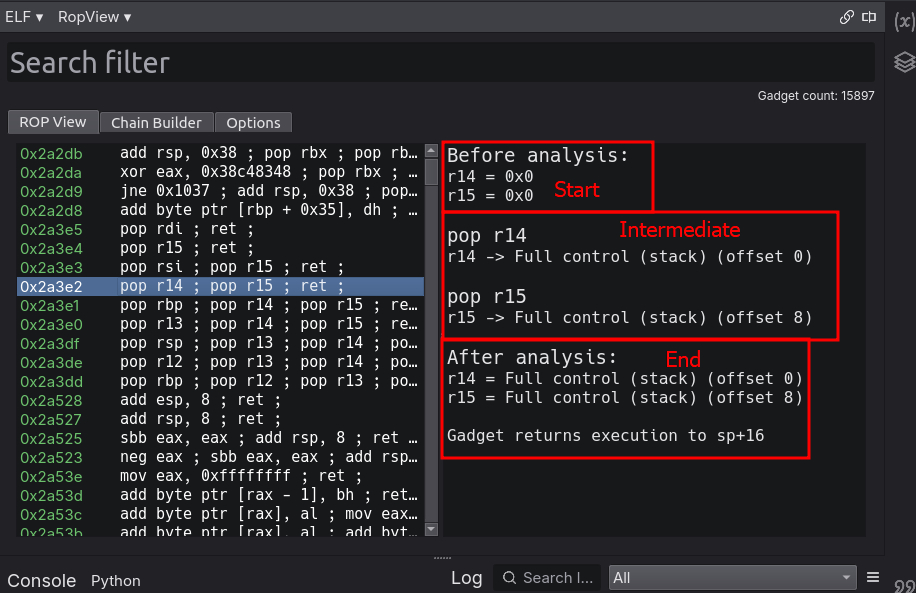
RopView is a visual ui plugin that is registered as an additional Binaryview for the current session. The layout of the plugin involves a tab system with a search filter, which remains accessible from any selected tab. The first tab, which is where the majority of time will likely be spent, is the gadget analysis display. It is made of two panes, a gadget pane, and a focused analysis pane. The gadget pane will display the entire gadget pool with user-specified filters and options applied, or gadgets that service a search request. Under the hood, the gadget pane is a QTreeWidget with scrollable items (via tab or arrow-key navigation). Additionally, double clicking on a selected gadget will navigate to its address in the primary linear Binaryview. Effects of the currently selected gadget are rendered in the analysis pane.
Analysis reports consider three focal points (only effected/clobbered memory is analyzed in each):
- Start state (Before analysis)
- Effects before gadget executes
- Instruction states (During analysis)
- Effects after each instruction in the gadget
- End state (After analysis)
- The memory state the gadget leaves behind
- The memory state the gadget leaves behind
Analysis is done through gadget emulation and certain algorithmic decisions were made in order to make the emulation as fast as possible. Moreover, analysis details are saved as ‘GadgetAnalysis’ objects, which contain the prestate, step-states, and end-state tied to a gadget address. These objects are cached and used both to resolve an analysis report if a gadget is re-selected and to assist in semantic search functionality. More technical details relevent to the analyzer itself— which will likely be the most interesting aspect of this post— will be discussed later in the relevant section.
In between the main window and the search box are two status boxes which display the gadget count (tied to the GadgetPane which could be the full pool or search results) and the search status (success or failure). The second tab contains a chain builder, which was originally going to be included with the first release, but due to certain constraints and focus on the primary functionalities, was not. In the future, gadgets from the GadgetPane will be able to be added and ordered in a list on this pane, which you can then choose or create custom script presets for.
The last tab includes configurable settings for both the standard gadget search and analysis prestates. Here register prestates can be explicitely defined and these will be used for all further analysis and semantic searches. Ideally, you’d set the registers you care about to their correct values at the time of controlled execution and further analysis will more accurately reflect what gadgets matter to you given your situation. The only other option which is out of the ordinary is the semantic depth option, which directs how many gadgets deep a query should explore for servicable gadgets.
One of the largest components, which I will breifly talk about but not get deep into because it is uninteresting, is the GadgetRenderer. This pane is responsible for repooling (if an option is changed such as depth, which effects the initial gadget pool) or sorting the current pool (options like bad bytes or duplicates). No matter the caller of GadgetRender, it will always consider the current configuration context when initiating and rendering a GadgetSearch. Speaking of which, the GadgetRender does, and obviously so, have ALOT of call sites from various components within the tool.
Compatibility
Currently this tool only supports i386 and amd64 architectures and an assert needs to be passed for the tool to be successfully initialized. Adding support for ARM and MIPS is one of the most prominent features I’d like to include in the future and will likely be the first thing worked on in future development. Obviously, as a store/load architecture many different components will have to be added to support this and it won’t be as simple as an update to the tool’s constants. For instance, delay slots will need to be considered in gadget exploration as well as how gadget searches are done entirely as both are constant-sized 4 byte instruction sets. Additionally, more gadget querying options would be ideal for both (ie: for MIPS, queries for stackfinders, lia0, double jumps, etc). The largest component that will need to be reworked is the GadgetSearch. What would likely require the least reconfiguration would be the GadgetAnalysis, which does diffing and analysis purely based on memory states and does not rely on static checks or hueristics.
Gadget Discovery (What exactly IS a gadget?)
That stuff was boring and dumb, but nessecary in order to give a high-level overview of the tool’s primary functionality and design. Now onto the more interesting stuff, actually dealing with gadgets. As mentioned earlier, this tool does everything in-house and does not rely on a third-party for actually finding and loading gadgets. Gadget discovery is the first task run by the GadgetRender during initialization and is responsible for finding gadgets within the current Binaryview’s data. It is important to note the algorithim I am about to talk about for doing gadget searching is specifically tied to the x86 instruction set and as mentioned earlier, different considerations have to be taken for instruction sets like MIPS, as what dictates gadgets differs entirely.
This section will be a valuable part of this post, as rarely do I see people actually talk about gadget searching and how we do it. Additionally, it seems like people who are just dipping their toes into binary exploitation sometimes just blindly return to addresses that do things and don’t actually understand, “what makes a gadget?”. We’ll address both of these concepts here. Gadgets in x86 (and any language for that matter) are simple. For x86, a gadget is defined as any address you can return too, that decodes to a valid group of instructions and of which, ends with an instruction that lets you control execution flow. Unlike RISC architectures, x86 instructions are not a fixed size. This means that instructions in the x86 instruction set can be anywhere between 1 and 16 bytes. This matters because it essentially increases the pool of candidate gadgets since you can returned to misaligned addresses and walk backwards any n number of bytes and in a sense, create code that isn’t actually user-defined.


The GadgetSearch algorithm searches the binary for potential gadget sites (using regex matching) and then walks back n number of bytes (defined by depth) checking at each step, if a gadget exists (valid decoding occured). It does this until the depth is reached or a gadget-violating condition occured such as the control instruction no longer existing or a multi-branch. This algorithm also utilizes the binaryview's session data to cache all gadgets, which GadgetSearch will use in the future to resolve gadgets instead of searching again (unless an option change violates the accuracy of the current gadget pool and a flush is required).
Below is a psuedo-psuedo snippet of the code responsible:
# Ctrl is an archiecture tied constant in the following structure:
# (start constant, inst_len, inst regex, inst_type)
# ie: (b'\xff',2,b'\xff[\x10\x11\x12\x13\x16\x17]','call') for "call [reg]" control instruction
for ctrl in self.__control_insn:
    # Start search at base each time
    curr_site = self.__bv.start

    while curr_site != None:
        # Find potential gadget site
        curr_site = self.__bv.find_next_data(curr_site,ctrl[0])
        if curr_site is None:
            break
        # Saved to find next search site after depth search
        save = curr_site
        # Confirm gadget site using regex match
        if re.match(ctrl[2],self.__bv.read(curr_site,ctrl[1])) != None:
            # Depth search for gadgets and subgadgets
            for i in range(0,self.depth):
                if not self.__bv.get_segment_at(curr_site).executable:
                    break
                else:
                    curr_site = save-i
                    check_for_insn = self.__bv.read(curr_site,i+ctrl[1])
                    '''
                    Checks for gadget violators
                    '''
                    add_to_pool()
                    cache()

        # Next address to continue search from
        curr_site = save+1
        return True
Essentially, find all gadget sites using regex matching, count backwards, and add the gadget to the pool if no violations occur. It really is that simple!
Gadget Analyzer
The most attractive feature of this tool, which also acts as the backbone behind semantic searching, is the gadget analyzer. In abstract, the gadget analyzer works by creating a small, contextualized unicorn emulation for the gadget, hooking instruction steps and cpu exceptions, and handling errors as they come. The method chosen of “dealing with bad things as bad things happen” was purposeful in order to keep emulations as small as possible and as fast as possible. Essentially, more stuff is added to the emulation ONLY if it is needed and since we are dealing with a small amount of instructions and many emulations can be initialized at a time via selection scrolling, this seems like the smartest solution to a stupid problem.
Step 1: Initialization
First initialization occurs. During this phase an emulation context for the passed gadget is created. This is a “partial” context, as context building may be applied during the emulation depending on the gadget. This includes setting up registers according to the the prestate configuration, creating a small code section for the gadget and creating a stack, which notably contains cyclic data. The reasoning behind this is so that it is easier to tell during analysis if a register is corrupted with stack data and derive the offset of controlled corruption using cyclic pattern matching. It is also useful for detecting corruption in general and recovering using the last, non-cyclic value. After configuring registers, mappings, setting the permissions of and writing the latter segments, and adding unicorn hooks, the emulation is ready. Note that the hooks are the most important aspect of this analysis framework. They let us to do analysis, harness CPU violations, and allow for contextualizing the memory state in realtime.
There are three hooks:
- Code hook - Executes after the current instruction is fetched and before it is executed
- Memory Violation Hook - Executes when unmapped memory is fetched
- Interrupt hook - Executes when a CPU interruption has occured (simply aborts)
Step 2 : Emulation and Realtime Contextualizing
Now that the partial gadget context is created and exceptions have been harnessed, emulation is ready to begin. One of the reasons unicorn was chosen over other emulation frameworks, is because unicorn is lightweight and contextless. This gives us the benefit of being able to create lightweight emulations with a small amount of memory mappings. However, this also means that we are unable to emulate interrupts and syscalls and that gadget execution sometimes does not accurately reflect the true binary context.
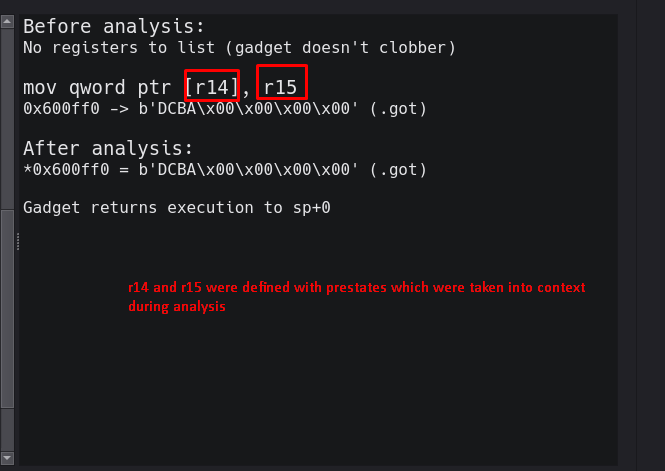
For example, consider the following gadget:mov [r14], r15 ; ret ;
This gadget moves the value of r15 into the dereferenced location of r14. There are two issues here, one of which we can handle gracefully.
Issue A: r14 could point to memory that is statically mapped into the binary (ie: .text, .data, .got, etc) of which we could resolve.
Issue B: Alternatively, r14 could point to memory that is dynamic, randomly based with ASLR and purely dependent on runtime context.
The first situation we can handle in a gracefully stupid way. The second is a little harder and is not supported at this time, however I plan to allow corefile imports in the future, which will handle this scenario. In either case, knowing the initialization of the analyzer as described, we know both of these scenarios would result in failure as the CPU tries to fetch unmapped memory. This is where the first hook I will discuss comes into play, the memory violation hook. One of the steps that occurs before emulation actually starts, but as a part of the emulation function, is a check in a queue of mappings. If this list contains any mapping, it is resolved using helper functions, then dequeued (the actual data structure being used is a list, treated as a queue). This is done by resolving the nearest page-aligned boundary that overlaps the target address. Then emulation will continue. This is what this process looks like:
The memory hook simply catches fetch violations, analyzes the dereferenced area by comparing it to mapped memory in the binary and sets an error code (which can be recoverable or non-recoverable). If the situation is recoverable via resolving then the mapping is enqueued. If the situation is not recoverable, -1 is inserted at index 0, which will direct the emulation handler to stop execution and generate an error description. Some examples of errors that are not recoverable is trying to execute mapped, non-executable memory or a null dereference. From this point on, in both cases, emulation is stopped and the handler is recursively called. Something that the diagram does not illustrate is that the emulation handler also deals with weird side cases, like stack pivots, before recursion so that emulation can continue properly.
Step 3 : Step-thru Analysis
The second hook is the code hook, this hook is responsible for doing analysis and diffing at each execution cycle. This hook is after the next instruction is fetched, but before it executes. It is responsible for both saving various components of the current memory state (incase weird corruption occurs we can recover using these components) and saving analysis. Analysis information is saved in a list, where every index corresponds to the index of an instruction in a gadget and each element represents a dictionary of the memory state at that time of execution.
For example:
Gadget:
pop rdi ; mov rsi, 0x3 ; ret ;

Analysis:
[{rdi:'Full control'}, {rsi:3}]

(Memory states can include reg:val or loc:val mappings)
The end state (used for both display and semantic queries) is simply derived from analysis_steps[-1]. Additionally, the saved previous program state is used for register diffing next time the step hook is called. Essentially at any point during emulation when the code hook is called there will exist a last_program_state that the current context will reference for recovery options and diffing.
In summary, GadgetAnalysis intializes context and does emulation with resolving and analysis occuring in between each emulation step, in addition to finalizing data (like resolving offsets for steps that contain cyclic data and unmapping unicorn memory). The full process can be illustrated below:
Semantic Search Filters
The search filter is unique to other tools, not just for its semantic searching capabilities, but for its handling and logical parsing of queries in general.
I have not yet seen the ability to create advanced boolean logic queries such as this on any other ROPping tool and you don’t realize how nice it is to have until you have it. Searching for gadgets (in terms of searching an already existing gadget pool), has always been a pain, but no longer!
Of course, I am not responsible for the search parsing and querying functionality, this is thanks to one of the tool’s dependencies, pandas. Pandas is a data analysis library for python, whose primary feature is collecting data into objects called Dataframes, which are table-like structures with columns (data attributes) and rows (items). Dataframes can be queried for series, which are collections of dataframe items tied to a singular column, which can be queried further using logical operators as shown in the above example. The main functionality RopView is responsible for handling is populating the gadget pool dataframe, its attributes, and translating search strings and presets to Dataframe queries. I will not be going too in-depth into this, as just using regex is the primary driving factor behind this.
The gadget pool dataframe is derived from the gadget pool cache, which is stored in the session. This pool contains all gadgets (including duplicates), regardless of options. It is important to note here, that options constrain what is displayed via GadgetRender and do not actually effect the gadget cache. The gadget pool Dataframe, like the cache, will contain every gadget found. In the future, I plan to integrate the session cache and Dataframe into a singular object tied to the session (if indexing a Dataframe has better time-complexity). Currently the gadget pool Dataframe is tied to the SearchFilter and its table has the following primary queriable columns:
- Address (Unsigned long)
- Bytes (String)
- Disasm (String)
- inst_cnt (Int64)
- All registers (each an unsigned long)
Queries and presets are simply translated to valid Dataframe queries tied to these columns when doing a general search. However, when a query contains a semantic search element, stuff becomes more complicated. All register columns are initialilly equal to the value of a ’not yet analyzed’ sentinel value and analysis must take place in order to populate these to their actual value (or remain the sentinel value if the register is not clobbered). Recall that GadgetAnalysis actually caches analysis states for later resolving until the prestate or some other dependent attribute changes, so it is not computationally expensive to run an analysis on a gadget.
Semantic querying is done in 3 steps:
- Query translation
- Dataframe transformation
- Dataframe querying
At the first step, we use regex to find matches for a semantic search in the query ([reg][\>\<\=\-\+\*\\]{1,2}) and then transform it into a valid Dataframe query we will use later.
An example translation is as follows:
Semantic search value: rax>0x3b
Translation: ((rax>0x3b or (rax==CONTROL_SENTINEL)) and not rax==UNINITIALIZED_SENTINEL)
The control sentinel value here represents a register which analysis determines we have full-control of (such as a popped register). We’d want to include these in the search results, since we can use these to make a register equal any value and thus it would always match any query. Additionally, we disclude the uninitialized sentinel because this sentinel value also represents unclobbered registers and at the time of processing this query (after transformation) we assume this is the only possibility the value represents. After the query is built, we transform a subsection of the dataframe.
Illustrated below is how we do this.
Similarly presets are also just translated into static queries or queries that are tied to specific architecture constants:

Since in the end, all user-provided queries are essentially just mutated into queries accepted by the Dataframe, I plan to add support in the future for more filter customization, such as providing custom preset-query translations, although you could do this yourself by just adding it in the source! (Note that when providing translations, the result query should use functions explicitly tied to the series type and not other translations defined in SearchFilter ie: use .str.contains and not .has).
If you the reader happen to have any ideas in regard to presets you’d like to see or additional gadget attributes for Dataframe columns, please reach out!
Closing
That’s my tool! I hope you enjoyed this technical post describing it, which I believe was well-worth writing considering the interesting algorithms and techniques that this tool adapts to do what it does. Although in retrospect, my code is not the cleanest or most optimized, I believe it is optimized enough and that some novel techniques are utilized to make it run fast with accurate results. Furthermore, this tool is an open-source plugin, so if you’d like to add a component, feature or modify existing structures, I encourage you to make a PR! All assistance is greatly appreciated considering I’m the sole developer and I am very busy with college and normal kid stuff (of which this is excluded). I plan to actively maintain this project in the foreseeable future, specific developments I have planned can be found on the repo, but updates might be far-between because of other priorities. If you’ve enjoyed this post please share it with your pwn-pals and do let me know if you’re enjoying the tool. Thank you!